Quantcast
Channel: General – Cloudy Migration Life
Viewing all 17 articles
Browse latest View live

How to write (migrate) sidHistory with Powershell (1)

$
0
0

The adventure of sidHistory
I spent quite some hours during the last weeks to create a Powershell script routine that is able to “migrate sidHistory”. Migrate sidHistory in this context means to read the objectSID of a given user or group source object in Active Directory Forest A and write this value into the sidHistory attribute of a selected user or group object in Forest B.
Assuming there is a trust relationship between Forest A and Forest B and sidFiltering is disabled, user B from Forest B who has the sidHistory attribute filled with the SID of the user A from Forest A will have access to the same resources in Forest A like user A himself. The reason for this behavioris found in the fact that the security token of User B after successful logon will contain the SID of user A. From Windows’ token based access strategy, user B is now a user AB as long as we are talking about SID releated resource access.
From those few lines everyone agrees on the statememt that sidHistory functionality can be abused to get access to resources which are restricted for a user by default. In principle, you can add the SID of a given user from Forest A to any user in Forest B. There does not have to be a dedicated relationship like identical samaccountname of the two users (groups) etc. While exactly his functionality helps to ease Inter-Forest Active Directory migrations (and Intra Forest Migrations as well when you take care), it can also be a dangerous thread against your Active Directory security.
However, this not a new finding and Microsoft did well in treating sidHistory as a special attribute. It needs special treatment when you try to clear the values and it needs special treatment when you want to write values into it. I already published 2 posts about deleting sidHistory, see [Link], so we will concentrate here on writing sidHistory.

Writing sidHistory
The most common way in today’s Active Directory migration scenarios is writing sidHistory by using a migration software. Microsoft ships its own migration software called Active Directory Migration Tool (ADMT) which is capable of writing sidHistory. Other vendors like Dell Software’s Migration Manager for Active Directory (formerly known as Quest Migration Manager for Active Directory) provide a similiar functionality with a lot more options and the possibility to write sidHistory in an ongoing Active Directory Synchronization. Up to now Microsoft Forefront Identity Manager cannot help us here out of the box to fill this attribute as part of an Active Directory synchronization.
When you try to put a SID into the sidHistory attribute by using the standard Microsoft administrative tools like the attribute editor from ADUC, you will fail for sure.

errorsidhistory

You will also fail by using Powershell integrated LDAP based write operations for this attribute like set-aduser or set-qaduser.

errorsidHistory_a

We have to dig deeper here to reach our goal of Powershell based writing of sidHistory, which we will do in Part 2 of this blog post.


How to write or migrate sidHistory with Powershell (2)

$
0
0

SIDCloner.dll
When you look in WWW to find a way to write sidHistory attribute, you probably will stop at the marvelous SID Cloner website created by Jiri Formacek, MSFT (http://code.msdn.microsoft.com/windowsdesktop/SIDCloner-add-sIDHistory-831ae24b). Jiri provides a managed class library that implements the SIDCloner class, which we can use in Powershell and any .NET programming code.
The SID Cloner class is built upon native API to migrate sidHistory and therefore uses the DsAddSidHistory function under the hood (http://msdn.microsoft.com/en-us/library/windows/desktop/ms675918(v=vs.85).aspx).
Although we do not need to install ADMT on any machine to run the SID Cloner code, we still have to consider to meet the same requirements for the migration setup as ADMT does. SID Cloner and ADMT come from the same “mothership” DsAddSidHistory.

SidHistory requirements
In brief we need the following prerequisites to be in place before we can start writing sidHistory (http://msdn.microsoft.com/en-us/library/windows/desktop/ms677982(v=vs.85).aspx):

+ a trust relationship must exist between source and target domain
+ source and target domain must not be in the same Active Directory forest
+ for source domain all actions will have the PDC Emulator as target; you cannot bind to another DC than the one with the PDC Emulator role
+ Auditing must be enabled in source domain
+ a domain-local group “domain$$$” must be created in source domain
+ a special registry key must be created on PDC Emulator DC in source domain: HKEY_LOCAL_MACHINE\System\CurrentControlSet\Control\Lsa\TcpipClientSupport
+ Audit Mode must be turned on in each domain and also Account Management auditing of Success/Failure events must turned to on.
+ the Security Identifier we want to transfer must not already exist in any sidHstory attributes of objects in target domain

Permissions:
For running Powershell code based on SID Cloner you do not necessarily need domain admin credentials in target domain. While read permissions on objects in source domain are sufficient (you are reading the “standard” attribute objectSID there), the permissions to modify the object in target domain by writing the sidHistory value requires more:
+ full access permissions to the object (better OU)
+ special permission “migrateSIDHistory” on the Active Directory domain object in target domain
migrateSidHistoryPermission

With all the requirements settled, you are able to migrate sidHistory by using the sample script, that Jiri published on the SID Cloner Website.

However, the most easy way to use the 4 fold overload with SIDCloner did never work in our tests.
Overload with 4 arguments means, you simply define source and target domain, source account from which you want to take the objectSID and target account where you want to write sidHistory.
This approach will probably never succeed because
a) the strict PDC Emulator access is not guaranteed when using a domain call
b) the credentials of the interactively logged user are obviously not passed to the DsAddSidHistory function inside the SID Cloner dll

Let’s have more findings around this Topics in Part 3 of this blog post.


Recovery Manager for Active Directory Forest Edition – 8.5.1 release is out

$
0
0

Dell Software released Version 8.5.1 of Recovery Manager for Active Directory Forest Edition.

The new release ships with multiple new features which were requested by many customers for a Long time:

Building virtual test environments
In the past the clone wizard provided only limited capabilities to build a test lab on base of our production Active Directory. Now the built-in logic of the Forest Recovery is used to create virtual lab to mirror an existing Active Directory.
The program component Active Directory Virtualization Lab works with MS System Center Virtual Machine Manager, VMWare ESX and VMWare vCenter.

Active Directory management capabilities
The tool now helps to manage Global catalog functionality and FSMO roles throughout your Forest’s domain controller infrastructure

Web Interface

The new Web Interface for Recovery Manager for Active Directory allows you to distribute the tool’s frontend much more easily

Support for BitLocker Drive Encryption when recovering Domain Controllers
If BitLocker is enabled on the domain controllers to be recovered, the tool will take care to disable BitLocker before starting recovery and to enable afterwards.

Enhanced Management Shell
Release 8.5.1 also ships with new Powershell commandlets to manage RMAD activities by script:
Expand-RMADBackup extracts the content of a backup file to a location you can select (same functionality as Extract Wizard from GUI)
Remove-RMADUnpackedComponent cleans up unpacked data from former restore operations
Remove-RMADCollectionItem removes items from a specific computer collection.

With Recovery Manager for Active Directory Forest Edition (RMAD FE) 8.5.1 you can restore Domain Controllers running the following OS Versions:

  • Microsoft Windows Server 2012 (including Server Core installation)
  • Microsoft Windows Server 2008 R2 without Service Pack or with Service Pack 1 (including Server Core installation)
  • Microsoft Windows Server 2008 with Service Pack 1 or Service Pack 2 (including Server Core installation)
  • Microsoft Windows Server 2003 R2 without Service Pack or with Service Pack 2
  • Microsoft Windows Server 2003 without Service Pack or with Service Pack 1 or Service Pack 2

You can install Recovery Manager for Active Directory Forest Edition 8.5.1 on the following platforms:

  • Microsoft Windows Server 2012
  • Microsoft Windows 8
  • Microsoft Windows Server 2008 R2 without Service Pack or with Service Pack 1
  • Microsoft Windows Server 2008 with Service Pack 1 or Service Pack 2
  • Microsoft Windows 7 without Service Pack or with Service Pack 1
  • possible but not recommended:
    Microsoft Windows Vista with Service Pack 2
    Microsoft Windows Server 2003 R2 with Service Pack 2
    Microsoft Windows Server 2003 with Service Pack 2
    Microsoft Windows XP with Service Pack 3

You can view all additional Information on the DELL Website here.

If you need assistance in deploying the Software and set up an Active Directory Forest Recovery plan with this tool, please get in contact here.

Powershell 5 in Windows Management Framework V5 Preview

$
0
0

Microsoft released a Preview of the Windows Management Framework V5. As in the past, this package ships with the according version of Powershell. Powershell V5 will bring interesting new Features.

Among those are:

  1. OneGet module with a set of comandlets to manage Software packages
  2. Commandlets to manage L2 Layer Network Switches

Find the introduction article for Windows Managagement Framework V5 by Jeffrey Snover here on TechNet.

You can dowload the Preview here.

However, the mixture of Powershell Versions we find at customer Environments will get wider and wider. Same is valid for modules like ActiveDirectory or SnapIns for Exchange. One will need to start with a lot of checks in the beginning of the code when a script is planned to be used universally.

QMM 8.10 error: Agent is not ready to start – SCP not found

$
0
0

We used Quest Migration Manager 8.10 recently in a project at a customer for a combined Active Directory and Exchange migration. Overall target was to integrate a Windows 2003 domain cross forest and cross org into the central AD Forest with several child domains. Since from mail perspective our migration source was Exchange 2007 and our migration target Exchange 2013, we decided to use the Native Move Job option along with the Migration Manager for Exchange Agent (MAgE) services.

Situation:

The customer environment look like the following:
Source Domain in Single Domain Forest with Domain Controllers on Windows 2003 and Exchange 2007 as mail system.
Target Domain was one of several child domains in the central Forest. All domain controllers running Windows 2012 R2 and mail system was Exchange 2013 SP1.
All Exchange 2013 servers had been deployed to root domain which also kept all important system and admin accounts.
To limit complexity in the setup of Quest Migration Manager 8.10, we decided to use a single administrative account from target Forest’s root domain and granted all necessary permissions in the domains to run both, Active Directory and Exchange migration. Only for access to source Exchange 2007 when running the move request, we used an account from source domain with Org Admin permissions.

Native Move Job
Setup for Native Move Job

Installation of Migration Manager 8.10. on a member server in target domain (best practice recommendation) including all cumulative hotfixes went smoothly. After successful Directory Synchronization, we connected to the Exchange source and target Organization and finally deployed 2 Instances of the MAgE agent for native mailbox move jobs on our agent host and console server. Note: For agent hosts Windows 2012 R2 is currently (May 2014) not supported. You have to stay with Windows 2008 R2 here.

Problem:

However, after starting the agent services running with our administrative account , we recognized, that we could not open the log file of the agent in the Log Panel inside the Migration Manager for Exchange GUI. We searched for the log file and found it in “c:\progamdata\quest software\Migration Agent for Exchange\NativeMove directory”.

scp not found
Log snippet from MAgE agent

The log file showed that the agent was not starting to process the migration collection due to missing settings and then went to sleep. The lines of error:


Waiting for agent settings: Not found: (&(objectClass=serviceConnectionPoint) …..

Agent is not ready to start. Agent going to sleep at 1 minute.

repeated over and over.

Obviously the agent tried to execute an LDAP query to find a connection point in Active Directory.
Note: Currently QMM 8.10 uses 3 different systems to store configuration data: An ADLDS server, a SQL Server Instance and the Active Directory (ADDS).

Service Connection Point (SCP):

We ran the query which was shown in the log file against the target domain and we could find the Service Connection Point (SCP) immediately in the System container of the domain naming context.

QMM_8.10_SCP

The Service Connection Point consists primarily of the keywords array attribute and the serviceBindingInformation attribute. The QMM MAgE looks for the serviceBindingInformation attribute to get its SQL connection properties. In SQL it will finally find all information to process the collection.
QMM_8.10_SCP_3
We do not know why Developers at Dell Software made this process so complex. However, in our setup the agent could not find the Service Connection Point, because the agent was looking in the domain, where its service account was located and this was the root domain of the forest while the agent host had installed the SCP during installation in the child domain where the computer account was member of.

Solution:

Switching the agent host and agent service account to an account from child domain would have been a solution, but was not in compliance with customer policy to host all system accounts in root domain.
Moving agent host and console to root domain would not have meet best practices and would have interfered running directory synchronization.

So we ended up in giving the agent just what it requested:
We manually created a Service Connection Point in the root domain and copied all serviceBindingInformation values over.

The agent started immediately and worked without errors.

For future design we can only recommend to store Service Connection Point in the Configuration Partition as Exchange and lots of other software. Using the domain naming context will always lead to problems in a big Enterprise environment with Active Directory consisting of multiple domains in a  forest.


Tool Factory: Introducing PS-REPADMIN 1.0 – Part 1

$
0
0
group_single_mode_1
PS_REPADMIN 1.0


Background
Multiple services modifying attributes in Active Directory
In our Active Directory migration projects and IDM implementations we often come to situations where we need to have a look at the metdata of Active Directory attributes. When different synchronization services can modify attributes and local IT administration is ongoing, it is helpful to see very quickly which attribute was changed when and on which domain controller.

REPADMIN and PS-REPADMIN
Assumption made, that running synchronization services like DSA from Dell Migration Manager for Active Directory and maybe Forefront Identity Manager use different Domain Controllers, the object and attribute metadata can help you to sort out what was the latest change and by which tool in which domain.
When we were forced to use the native CL tool REPADMIN over and over to get evidence of what and when changed group membership, we decided to create the GUI based PS-REPADMIN utility.
The task of getting the Active Directory metadata at a glance for one identity in one or two domains – including the actual attribute values – is now easier to handle and see.
In comparison mode, you can see the metdata of a cross-forest synchronized object side-by-side and find out lack of synchronization streams.

Requirements
The utility is built with Sapien Powershell Studio  and fully based on Powershell and .NET. It requires Powershell 3.0 and the Active Directory Module to be present on the executing host. Active Directory Management Gateway Service needs to be present on Windows 2003 and Windows 2008 domain controllers, while no special requirments are necessary for Windows 2008R2 and later.
The utility was designed and tested for user and group objects.
The executing account needs to have read permissions in all domains on the objects you want to query for the metadata.

Active Directory Federation Services 3.x Technology Basics

$
0
0

Active Directory Federation Services (AD FS) provides Web single-sign-on to authenticate a user to related external hosted Web applications. AD FS performs this by securely sharing digital identity and entitlement rights or claims across security and enterprise boundaries.

AD FS supports distributed authentication and authorization over the Internet to provide access to resources that are offered by trusted partners.

Another aspect of ADFS technology can be found in providing external access from Internet connections to internal resources. In that case the ADFS server can provide an additional layer of security by offering various pre-authentication methods, while the second part of the ADFS technology, the Web Application Proxy server (WAP) acts as a Reverse Proxy by terminating the incoming SSL connections.

In version 3.0 of the ADFS technology, the WAP server cannot be run without ADFS server in the backend, which stores the configuration of the WAP servers. The WAP servers themselves are “stateless” and therefore easy to scale up behind a Layer 4 Load Balancer.

ADFS Server Farms

The Active Directory Federation Services technology can be scaled out by deploying multiple ADFS servers in a farm model. The servers share the same configuration information which is stored in a database on each server (Windows Internal Database (WID) model) or in a central SQL store. In most of the implementations, the WID model is used.
For using the WID model, the configuration can only be modified on the Primary ADFS server and is then replicated to all other ADFS servers of the same farm.
To find the Primary Server use the command “get-adfssyncproperties” on one of the ADFS servers:

Web Application Proxy server

The Web Application Proxy Server is typically the Internet facing component of the Active Directory Federation Services technology. Located in the DMZ, the Web Application Proxy (WAP) servers act as reverse proxy server and terminate the incoming SSL connects from the Internet to the published applications.
Web Application Proxy servers are N to 1 connected to a specific ADFS server (farm). Multiple WAP servers can be easily configured for Layer 4 Loadbalancing.
Since WAP servers are “stateless”, they do not store any persistent configuration information, but load the information from the Primary ADFS server. Therefore a WAP server cannot exist without underlying ADFS server and needs to be installed after the ADFS farm has been deployed.

When acting as reverse proxy for client access using IWA (Integrated Windows Authentication) or when serving non claims aware application access based on Kerberos, the WAP servers must be able to perform Kerberos Constrained Delegation. The WAP server presents a Kerberos token on behalf of the accessing client or user, which in consequence requires the WAP server to be a member of an Active Directory domain. Unfortunately the domain membership of the WAP server means to open a lot more ports from the DMZ to the internal network, which is a disadvantage from network security perspective.

For that reason, applications that do not require Kerberos Constrained Delegation should always be published on non domain based WAP servers, where the exception is to publish applications on domain based WAP servers.

Example for ADFS Farm structure:

SSL Hardening for Web Application Proxy Servers

$
0
0

The Web Application Proxy (WAP) Servers act as an SSL termination instance towards the Internet. External connections that try to access the Active Directory Federation Services (ADFS) farm or internal applications that are published via the Web Application Proxy will terminate their SSL connections at the Web Application Proxy. Unfortunately, the Windows 2012R2 server default settings allow a lot of SSL Cipher Suites that are publically known as weak or “outdated” like SSLv3, DES encryption and key length below 128bit. The preferred Server Ciphers of a freshly installed and updated Windows 2012R2 server are SSLv3    168 bits        DES-CBC3-SHA TLSv1    256 bits        AES256-SHA Therefore from a network security standpoint it is mandatory to harden the SSL settings on the Web Application Servers BEFORE opening the WAP server in the DMZ for incoming Internet connections. The best option to harden the SSL settings on a standalone Windows Server 2012R2 is to modify the Local Group Policy: From a commandline run: “gpedit.msc”. In the computer section navigate to “Administrative Templates – Network – SSL Configuration Settings”  Edit the “SSL Cipher Suite Order”:

The listed Cipher suites can be exported and adjusted to the actual security requirements by deleting the unwanted Ciphers from the list. As a minimum all combinations that contain SSL2, SSL3, DES, 3DES, MD5 elements are deleted as well as all combination with a cipher length below 128bit.

Information

The list needs to be sorted in a way that the preferred SSL ciphers are on top.

Afterwards create a string of the values from list and separate each cipher by “,” without any blank. Don’t leave a “,” at the end of the string. The input box in the GPO menu has a limited size. Make sure that your string fits into this limit. If not, delete further ciphers which are not widely used.

Warning!

It looks like simply activating the new local GPO by running “gpupdate /force” is not sufficient. Please reboot the WAP servers one-by-one after setting the SSL cipher policy

However, before we open the firewall, an internal test should be executed to validate the SSL hardening. You can run the sslscan tool (you can download from here sslscan) from another computer in the DMZ or the WAP server itself. DNS resolving of the federation or application name must resolve to the external Load Balancer or interface of the WAP server. Example for SSL Server Ciphers before SSL Hardening (left side) and after SSL Hardening (right side):

When the Web Application Proxy server has been connected to the Internet finally, a second check can be achieved by using one of the proven Internet based SSL scan tools, e.g. https://www.ssllabs.com/ssltest/ .

You can find a string of the recommended SSL ciphers for importing into local GPO here.


Recommended Blog Post: The good, the bad and sIDHistory

$
0
0

rkmigblog:

Based on various experiences with Exchange 2010 behavior after an Exchange and Active Directory Inter Forest Migration, Exchange PRO Ingo Gegenwarth published this interesting Post:

Originally posted on The clueless guy:

This post is about my personal journey with a cross-forest migration.

When it comes to account migration there is no way to do so without sIDHistory. It would be really hard to have a smooth migration without.

By using this attribute a end-user most likely won’t experience any impact…..unless you start doing a cleanup of this attribute.

In terms of Exchange users might see something like this

Calendar_Error

or this

Inbox_Error

But what’s behind those issues and how could you mitigate this? I was part of a migration, where those issues popped up and I’m going to describe how you could determine possible impact for end-users before it happens.

View original 3,675 more words

“Missing-Partition-for-run-step” error when starting first Import job in Microsoft Azure AD Sync

$
0
0

After installing the latest Version of Azure AD Sync we received the error “missing-Partition-for-run-step” in the Operation pane of the Synchronization Service Manager when trying to start the Full Import as very first step in our Run Profile.

The error only shows up when both is true:

  • The AD Forest as source of the Synchronization is a multi-Domain Forest
  • You configured the Azure AD sync to synchronize not all Domains of the Forest

By default the Azure AD Installation procedure creates a default run profile that includes all partition (domains) for the Import, while we filtered out the root domain in the Connector configuration.
To resolve the problem you need to clean up the Run Profile created by the Azure AD Sync wizard automatically. From Connectors pane select “Configure Run Profiles” and delete the run steps that include the unwanted “domains”. After the cleanup, you will successfully run the Import job.

Trace Debugging ADFS (1) – ADFS

$
0
0

Debugging an Active Directory Federation Services 3.0 farm together with the Web Application Proxy servers in front can be a very complex task when you think of all the different constellations that can be served by this technology. Especially when it comes to access from mobile devices and Microsoft Online as relying party.

In principle, trace debugging can have 3 target scopes:

  • Trace debugging on the backend – on WAP servers and ADFS servers to see how the authentication request is terminated
  • Trace debugging on the accessing device – to see how the authentication request is initiated
  • Network trace to see the authentication flow travels from device to the ADFS farm and back. Actually you need to terminate the SSL connection with a special tool like Fiddler to inspect the content.

For many professionals the Fiddler trace will be the most complex way to start debugging, especially when you are acting in secured and controlled enterprise network. Many apps on mobile devices (e.g. the Office Apps for Android) also show poor logging and tracing capabilities to show what the app is actually doing in terms of federated authentication.

Therefore, we should utilize the complete debugging capabilities of ADFS as preferred option. As long as there is a communication between device and WAP/ADFS servers, we fortunately receive a lot of information from the Trace logs of the backend servers.

STEP 1: Set Trace level and enable ADFS Tracing log:

  1. Please enable the debugging logging on the ADFS 3.0 Server:
    Open an elevated CMD window and type the following command: C:\Windows\system32>wevtutil sl “AD FS Tracing/Debug” /L:5
  2. In Event Viewer highlight “Application and Services Logs”, right-click and select “View – Show Analytics and Debug Logs”

3. Navigate to AD FS Tracing – Debug, right-click and select “Enable Log” to start Trace Debugging immediately.

4. Navigate to AD FS Tracing – Debug, right-click and select “Disable Log” to stop Trace Debugging.

5. It is difficult to scroll and search in the events page by page in the Debug Log. Therefore save all Debug events into an *.evtx file first.

6. Open the saved log again. Now you can scroll and search a lot smoother through the Events.

ADFS – How to enable Trace Debugging and advanced access logging

$
0
0

Dieser Beitrag wurde am 18.11.2015 um 22:38:18 in Cloudy Migration Life veröffentlicht

ADFS – How to enable Trace Debugging and advanced access logging
Debugging an Active Directory Federation Services 3.0 farm together with the Web Application Proxy servers in front can be a very complex task when you think of all the different constellations that can be served by this technology. Especially when it comes to access from mobile devices and Microsoft Online as relying Party.
In principle, trace debugging can have 3 target scopes:

  • Trace debugging on the backend – on WAP servers and ADFS servers to see how the authentication request is terminated
  • Trace debugging on the accessing device – to see how the authentication request is initiated
  • Network trace to see the authentication flow travels from device to the ADFS farm and back. Actually you need to terminate the SSL connection with a special tool like Fiddler to inspect the content.

For many professionals the Fiddler trace will be the most complex way to start debugging, especially when you are acting in secured and controlled enterprise network. Many apps on mobile devices (e.g. the Office Apps for Android) also show poor logging and tracing capabilities to show what the app is actually doing in terms of federated authentication.

Therefore, we should utilize the complete debugging capabilities of ADFS as preferred option. As long as there is a communication between device and WAP/ADFS servers, we fortunately receive a lot of information from the Trace logs of the backend servers.

STEP 1: Set Trace level and enable ADFS Tracing log:
Please enable the debugging logging on the ADFS 3.0 Server:
Open an elevated CMD window and type the following command: C:Windowssystem32>wevtutil sl “AD FS Tracing/Debug” /L:5

In Event Viewer highlight “Application and Services Logs”, right-click and select “View – Show Analytics and Debug Logs”

In Event Viewer highlight “Application and Services Logs”, right-click and select “View – Show Analytics and Debug Logs”
Navigate to AD FS Tracing – Debug, right-click and select “Enable Log” to start Trace Debugging immediately.


Navigate to AD FS Tracing – Debug, right-click and select “Disable Log” to stop Trace Debugging.
It is difficult to scroll and search in the events page by page in the Debug Log. Therefore save all Debug events into an *.evtx file first.


Open the saved log again. Now you can scroll and search a lot smoother through the events.

STEP 2: Enable Object access auditing to see access data in security logs:
If we want to see exhausting data about access activities on the ADFS servers we have to tun on object access auditing (not account logon auditing). You have to enable auditing in 2 locations on the ADFS server.

  1. Turn on auditing in the ADFS GUI. On the primary ADFS server right-click on Service and activate “Success audits” and “Failure audits”. This setting is valid for all ADFS servers in the farm.
  2. To make this setting actually work, you have to do a second step on the ADFS server in the Local Security Policy (unless there is a similar Group Policy setting coming from the Active Directory structure).
    Open the GPO Editor, navigate Computer ConfigurationWindows SettingsSecurity SettingsLocal PoliciesAudit Policy and configure “Audit Object Access” with “Success” and “Failure”. This setting has to be made in the Local Security Policy on each ADFS server (or a GPO is set on OU or different level in Active Directory).
  3. Looking at the security event logs of the ADFS servers, you will notice a much higher amount of events coming in which provide a much higher level of insights.

It is a good starting point to exactly note the time when running e.g. an access attempt and then look up the timestamps (+ offset for runtime) in both event logs, ADFS Trace Debugging and Security.


Work Folders Part 1: Overview and Requirements

$
0
0

Overview und Benefits

Work Folders – one of the most exciting new feature in Windows Server 2012 R2 that creates a lot of new possibilities for Bring Your Own Devices (BYOD) to provide controlled access to data stored on the corporate network. It provides the following benefits:

  • Users can access only their own Work Folders from their personal computers (or various devices) anywhere from centrally managed file servers on the corporate network
  • Enables users to access work files while offline and sync with the central file server (devices also keep a local copy of the users’ subfolders in a sync share, which is a user work folder)
  • Work Folders can co-exist with existing deployments of Folder Redirection, Offline Files, and home folders
  • Security policies can be configured to instruct PCs and devices to encrypt Work Folders and use a lock screen Password
  • Failover Clustering issupported to provide a high availability solution
  • Work Folders can be published to the Internet using the Web Application Proxy functionality (also new to Server 2012 R2), enabling users to synchronize their data whenever they have an Internet connection, without the need of a VPN or Remote Desktop

Requirements

Work Folders Server – a server running Windows Server 2012 R2 for hosting sync shares with user files:

  • Install the File and Storage Services role
  • Work folders is managed through Server Manager for a centralizing view of sync activity
  • Multiple sync shares can be created on a single Work Folders Server
  • You can grant sync access to groups (by default, administrators don’t have access to files on the sync share)
  • Possibility to define a device policies per sync share
Work Folders in Server Manager


User devices – best functionality is given with Windows 10, Windows RT 8.1, or Windows 8.1 operating systems; Windows 7, iPad, and iPhone clients are also supported

  • Files remain in sync across all user devices
  • Users work with their Work Folders like with any other folder. The only difference is that when right-click the Work Folders icon, they got the option to force synchronization with the server, and then to other devices
  • Users can access and use Work Folders from different devices, irrespective of their domain Membership

Written by B. Rajic.


Filed under: ADFS, General, WebApplicationProxy, Windows Server 2012

Web Application Proxy Event 13007

$
0
0
Written by Robert Kettel

When you start to use Web Application Proxy Server (WAP) as a replacement for ISA, TMG or UAG and publish Active Sync through it, you might face a lot of Event 13007 warnings in the Microsoft-Windows-Web Application Proxy/Admin event log (I mean, really “a lot”). These are paired with various Event IDs 13006 (“Connection to the backend server failed. Error: (0x80072efe)”).

On the other hand, you don’t get any complaints from the user community. There does not seem to be an impact at all.

Where do these warnings come from? Do they impact our service and can we prevent them from showing up over and over again?

The main cause for the warning 13007 and 13006 is how devices with Exchange Active Sync (EAS) and Direct Push technology connect to Exchange.

Following this Microsoft TechNet article, “a mobile device that’s configured to synchronize with an Exchange 2013 server issues an HTTPS request to the server. This request is known as a PING. The request tells the server to notify the device if any items change in the next 15 minutes in any folder that’s configured to synchronize. Otherwise, the server should return an HTTP 200 OK message. The mobile device then stands by. The 15-minute time span is known as a heartbeat interval.”

With other words, there is a steady HTTPS session for 15 minutes between the EAS device and the Exchange backend which must be supported by all components taking part in the HTTPS session build, usually firewalls, load balancers and (in our case) the WAP servers which proxy the HTTPS session coming from the LBs to the Exchange backend. The long lasting session request is finally terminated by the Exchange server by posting an HTTP 200 message.

Now, looking at the default settings of our WAP servers we find a parameter which can have an influence on that behavior.
The default value for the InactiveTransactionTimeoutSec parameter is 300 (= 5 minutes). That means that if the accessing party does retrieve new responses from the backend service defined in the application settings for more than 5 minutes, the connection is identified as “timed out” and dropped by the WAP server.

From that perspective a connection to the Exchange Backend Service is timed out for the Web Application Proxy (causing a warning event 13007), when
a) the heartbeat interval of Direct Push is longer than the InactiveTransactionTimeoutSec
AND
b) the session was not renewed by the device
AND
c) there was nothing to synchronize in the first 300 seconds of the connection

However, if the device’s HTTPS session is dropped by the WAP server, it will automatically re-initiate a new session (the same what the device would do when getting an HTTP 200 OK message from the backend Exchange server). Therefore this is not a critical behavior at all.

The difference can be found how the device reacts on the dropped connection in comparison with how it handles the HTTP 200 OK post.
In the latter case, the device starts a new HTTPS session with the same heartbeat interval again.
In the first case, the device “assumes” that 15-minute HTTPS requests are blocked and re-initiates a new session with only 8 minutes (480 seconds) – which is still beyond the 300 second default setting of the WAP servers.

To avoid the Event 13007, the InactiveTransactionTimeOutSec parameter needs to be set to a value greater than the defined Active Sync max period. By default, the Active Sync device starts with a 15-minute interval, which would fit into a value of 910 for the InactiveTransactionTimeoutSec.

Since the parameter can be set for each published application individually, you luckily do not need to touch other published applications than Exchange Active Sync.

Example command:

Get-WebApplicationProxyApplication ExchangeActiveSync | Set-WebApplicationProxyApplication –InactiveTransactionsTimeoutSec

Note:

A support engineer with Microsoft Premier stated that there is currently no way to suppress the Event 13007 from appearing in the log files completely.


Filed under: ADFS, EventIDs, Exchange, Exchange 2010, Exchange 2013, General, WebApplicationProxy

Access Control Policies and Issuance Authorization Rules in ADFS 4.0 – Part 1

$
0
0

Windows Server 2016 ships with version 4.0 of Active Directory Federation Services (ADFS), which turns out to play a bigger and bigger role in providing SSO capabilities for companies using the Azure Cloud Services. Watch the Ignite 2017 session of Principal Group Program Manager Sam Devasahayam from the Microsoft Identity Divison for more information about new ADFS extensions like “Hello for Business” or the Azure Stack support for ADFS.

https://channel9.msdn.com/Events/Ignite/Microsoft-Ignite-Orlando-2017/BRK3020

One of the most important changes when comparing ADFS version 3.0 of Windows 2012 R2 with ADFS 4.0 of Windows 2016 are the Access Control Policies, which act now as the standard method of granting access, while we no longer see the Issuance Authorization Rules of ADFS 3.0 in the AD FS GUI by default.

However, ADFS 4.0 still supports Issuance Authorization Rules. This post will show how they can be used with ADFS 4.0 and why it makes sense.

Let’s first have a quick look on the modern easy way of granting access by using Access Control Policies:

ADFS 4.0 Access Control Policies

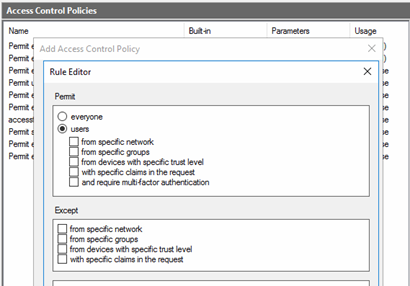
Access Control Policies in ADFS 4.0 allow to configure access to a Relying Party Trust via ADFS authentication based on several criteria.
You can either create Access Control Policies directly adding a new Access Control Policy in the Access Control Policy Container of the AD FS Management GUI (like stand-alone without connecting it to Relying Party Trust) or you can create it when creating the Relying Party Trust. The same functionality can be achieved via Powershell by using the appropriate ADFS commandlets.

Rule Editor of Access Control Policies

You can only assign one single Access Control Policy to one Relying Party Trust, but the Access Control Policy itself can consist of several rules, which are all “Permit” rules. Inside the rule, you can select multiple conditions, which are connected by, AND operators and multiple “except conditions that are connected by OR conditions.
Example for a Policy statement:
Permit users who access ADFS from a specific network AND who are member of a specific group, but even if those conditions are met, deny (Except) access when users are member of a deny group OR when users connect from devices with wrong trust level.

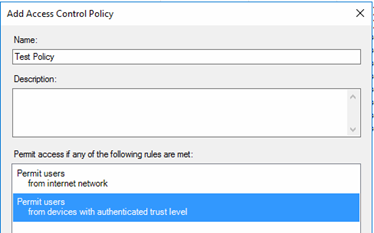
No matter how many rules are defined in an Access Control Policy – as long as the requesting user and device meet the conditions of one of these rules, the policy is valid and ADFS will grant access. If no condition is met, users are not allowed to use the Relying Party Trust and therefore are “denied”.

Multiple Rules in Access Control Policy

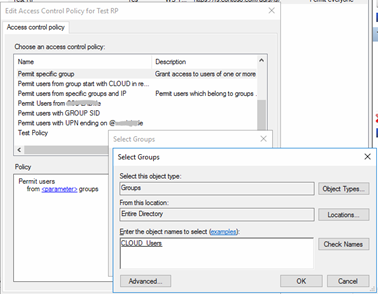
Some of the rules allow us to use parameters instead of defined values when creating an Access Control Policy. By doing this, we create rather an Access Control Policy template than a finalized Access Control Policy. Templates give us the advantage, that we can assign the same Access Control Policy to multiple Relying Party Trusts and still use different settings.
In the list view of the Access Control Policy container, you can see in the third column which Access Control Policies are parameterized and which are not. One of the pre-defined templates is based on group membership. The name of the group cannot be set in the template itself, but when it is assigned to a Relying Party Trust.

Access Control Policy with parameters in rule

Assigning the Control Access Policy to a Relying Party Trust allows replacing parameters by selecting groups from Active Directory.

Replacing the parameter placeholder by selecting groups

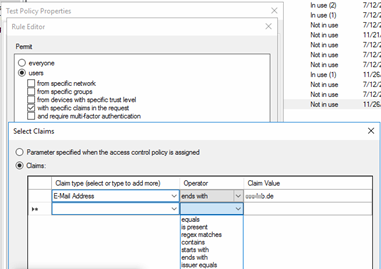
Another special type of rule in an ADFS Access Control Policy is to permit users (or devices) “with specific claims in the request”.
Based on an incoming claim you can decide by various operators including regex matching, who will get access by this rule.

Permit Rule for filtering on specific claims

You can only use claim types that are defined by your incoming claims. For example, if you want to filter by e-mail address suffix, you have to be sure that claim type E-Mail Address is part of the incoming claim. Therefore, this special rule depends heavily on the resource’s (cloud application) behavior in sending incoming claims.

Assigning and Removing Access Control Policies

You can create a Relying Party Trust with the AD FS Management GUI without assigning an Access Control Policy at all, but you cannot remove an existing one from a Relying Party Trust completely by using the GUI. You only can edit and replace by another one. However, the ADFS Powershell commandlets provide a way to achieve that and we described it in part 2 of this blog post.

Be aware, as long as you do not assign an Access Control Policy to a new Relying Party Trust, access to the Relying Party Trust is denied for all users automatically.

Access Control Policies vs. Issuance Authorization Policies

Overall, Access Control Policies are a very handy and administrator-friendly way of configuring complex access structures for securing Relying Party Trusts.
However, the rule editor does not allow you to make extended filters based on group names other than selecting specific group names one by one, which is too static for many Cloud scenarios.
We often see the case where all users should have access to a SAML Cloud Application whenever they are member of special Cloud security groups that start or end with a special syntax.
To fulfill such a request, using the Claim Rule Language with Issuance Authorization Rules is pretty much straightforward and very flexible when adding multiple conditions. We will show the advantages of Issuance Authorization Rules by playing the following use case:

Use Case Example:

All users who are member of any security group starting with CLOUD_ should get access to the Relying Party Trust (and get authorization for the Cloud application). If they are also member of any group starting with DE_, they should get a denial for that Relying Party Trust. Additionally, access is limited only to users who connect from inside the corporate network

By default, for Relying Party Trusts created in ADFS 4.0 / Windows 2016 the Issuance Authorization Rule interface is not available in the GUI. Nevertheless, there is a way to switch over and we will explain that in post “Access Control Policies and Issuance Authorization Rules in ADFS 4.0 – Part 2”.


Tool Factory: Release of PS-REPADMIN 1.9

$
0
0

PS-REPADMIN 1.9 is available now. PS-REPADMIN helps to view object metadata and attribute values in a simple table view.
We made several improvements in 1.9, especially for comparing groups with their metadata between trusted Active Directory domains. The tool also provides now an easier look on Proxy Addresses and Linked Attribute values.

PS-REPADMIN 1.9 was tested with Windows 10, Windows Server 2012 R2 and Windows Server 2016. Usage is on own risk. All rights reserved by Silverstar Consulting GmbH.
Download here to test the trial version for free.
(Note: After download, unzip the file and after that rename the .zip extension to .exe)

Full table view on attributes and their last change including group member values. The parallel listing makes it easy to compare values of objects from different domains.

Linked attributes are displayed in a separate view for easier comparison.

Download here to test the trial version for free.
(Note: After download, unzip the file and after that rename the .zip extension to .exe)

Access Control Policies and Issuance Authorization Rules in ADFS 4.0 – Part 2

$
0
0

In post “Access Control Policies and Issuance Authorization Rules in ADFS 4.0 – Part 1” we took a quick look on Access Control Policies in ADFS 4.0. We learnt that those can be a very helpful tool to grant permissions for using a Relying Party Trust.
However, in case of our request example, using Claim Rule Language together with Issuance Authorization Rules will meet the request straightforward while we would see difficulties when relying on Access Control Policies.
Here is the definition of our example:
Use Case Example:
All users who are member of any security group starting with CLOUD_ should get access to the Relying Party Trust (and get authorization for the Cloud application). If they are also member of any group starting with DE_, they should get a denial for that Relying Party Trust. Additionally, access is limited only to users who connect from inside the corporate network

Using Control Access Policies to create special access conditions where group membership based on a filter is the key to allow or deny access turns out to be difficult. In the Control Access Policy template, you can only choose specific groups from an Active Directory object picker, which is too static in our case where new security groups might be created and deleted again.

Only specific objects can be selected


Therefore, we use the advantage that ADFS 4.0 supports both, Access Control Policies and Issue Authorization Rules in the same farm.

How to get into the Issue Authorization Rules configuration item

When you create a new Relying Party Trust (RPT), you will noticed, that the wizard sets the “Permit everyone” Access Control Policy for your trust, but offers also to select from the list of templates and existing ones. A checkbox at the bottom gives you the option to skip the configuration of an Access Control Policy at the time of trust creation.

No Access Control Policy is set when creating the RPT


Right-clicking the Relying Party Trust after creation without setting an Access Control Policy still brings us to the well-known Access Control Policy selection.

Access Control Policies and Templates


In order to switch from Access Control Policy to the Issuance Authorization Rules menu we need to use the related Powershell Commandlet.

  1. We set a dummy policy as Access Control Policy (which does not do any harm because conditions are never met for access).
  2. We remove this Access Control Policy by setting $null.
Removing the existing Access Control Policy


Going back to the menu and right-clicking on the trust and selecting “Edit Access Control Policy …” will bring us a menu where we can define Issuance Authorization Rules, as we know from ADFS 3.0. Please note, that the Access Control Policy, which was cleared by our Powershell command No.2, has become a second life as Issuance Authorization Rule!

Issuance Authroization Rules visible in GUI again


The same is visible when retrieving the related attributes by using the Get-AdfsRelyingPartyTrust commandlet.

Get-ADFSRelyingPartyTrust shows Issuance Authorization Rules or the Access Control Policy


You will always have to use the Powershell Commandlet Set-AdfsRelyingPartyTrust if you want to clear an existing Access Control Policy from a Relying Party Trust. The GUI will only allow replacing policies.

Creating and placing the appropriate Issuance Authorization Rules

Once we know that we can place the rules as we know from ADFS 3.0, we can start to configure the conditions. Since we have to deal with the condition to be member of one or multiple groups that start with prefix “CLOUD_” and to be not a member of at least one group starting with prefix “DE_” at the same time, we will have to build two rules – one with an “add” statement and one with an “issue” statement.

The first rule will retrieve all the group names where the user is member and passes this information further to the second rule. This step is necessary because by default only the groups’ SIDs are part of the claim.

Rule with “add” statement to collect all token groups (group SIDs)


The second rule will then check for the permit group conditions (“name starts with CLOUD_”) and the deny group condition (“name starts with DE_”). Additionally, the rule checks for the presence of the “insidecorporatenetwork” claim, which exists whenever the user does not connect through public interfaces and works as incoming claim.
If there is no membership in a deny group, but membership in a permit group, and the user connects from the internal network, thus the rule will issue an authentication token (claim) finally.

Rules with “issue” statement to make conditions, filter and issue claims


Testing the Rule

When writing custom Issuance Authorization Rules, testing is key. If you plan to protect your production Relying Party Trust by complex access rules, you cannot go live with those without proper testing. There are several test applications around which make the outgoing claims visible and therefore easy to check.
Just assign the rules to the Relying Party Trust of the application and see if a test user can access or not (which implies a permit or deny of authentication though).
As you can see, from the screenshot below, our test user is member of two groups, that starts with “CLOUD_” in their names and he is obviously not member of a “DE_” group. We can also see that the “insidecorporatenetwork” claim is set to true which was another condition.

ADFS claim test application for installation in internal network

The fact that we can see the test application web site at all is the evidence that the user was authorized to use the Relying Party Trust and connect to the application. Mission accomplished without using Access Control Policies.

Microsoft has published a web based ADFS test application, which is called Claims X-Ray and works perfectly by mirroring the incoming claims.
You can find it here https://adfshelp.microsoft.com/Tools/ShowToolsInternal and external devices can access it, which makes it a very valuable troubleshooting tool.
Viewing all 17 articles
Browse latest View live